Focaccia Bread
Updated March 26, 2019
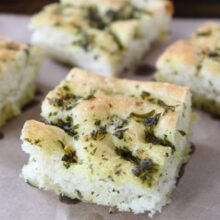
This homemade Focaccia Bread is loaded with fresh herbs, olive oil, and has a nice salty kick. This focaccia recipe makes a big pan and it is great with soup, salad, or any Italian meal!

Homemade Focaccia Recipe
My dad came to visit last week and we spent most of our time playing with Caleb, but of course we found some time to bake. My dad taught me how to bake when I was a wee one and I still love baking with him today. His cinnamon rolls are famous and he can bake up a mean loaf of Artisan bread.
I gave my dad The Bread Baker’s Apprentice Book years ago and I think he has made almost every recipe in the book. It’s a good one! We’ve made a few of the recipes together-Cinnamon Raisin Bread, French Baguettes, and Lavash Crackers. We’ve loved every recipe. This time we baked up Focaccia Bread. My dad has made the recipe several times, but it was a first for me. Trust me, it won’t be the last. This Focaccia Bread is amazing!

What is Focaccia?
Focaccia bread is an Italian bread that is dimpled all over and flavored with olive oil and herbs. The bread takes two days to make, but don’t be intimidated. There is a lot of inactive time-the dough has to rise in the refrigerator overnight. So there isn’t a ton of work involved, just time:) I promise patience pays off with this bread because the end result is SO worth the wait!
The focaccia bread is crusty on the outside and chewy on the inside. The olive oil, herbs, garlic, and salt perfectly season the bread. This recipe makes a huge pan loaf, so be prepared to share. Or if you are like us, just keep walking by the pan and eating a piece here and there. It is so hard to resist!
This bread does take some time to make but it is SO worth it! And it isn’t hard, I promise. The bread is loaded with olive oil and TONS of fresh herbs. You will love the salty kick too! Homemade focaccia is the BEST! And it is great for serving a large crowd because it makes a big pan of bread.
This Focaccia Bread goes well with salad, soup, lasagna, or any Italian meal. It also makes great sandwiches or panini. I am going to make this Focaccia Bread all summer long. It is a great recipe for using up those fresh garden herbs! Thanks Dad for baking with me!
You can serve focaccia bread with:
- Easy Skillet Vegetarian Lasagna
- Pasta Pomodoro
- Pasta Fagioli
- Vegetable Soup
- Spinach Artichoke Lasagna Roll Ups

Focaccia Bread Recipe
Ingredients
For the Bread:
- 5 cups bread flour
- 2 teaspoons salt
- 2 teaspoons instant yeast
- 6 tablespoons olive oil
- 2 cups water at room temperature
- Extra olive oil for greasing the pan
- Herb olive oil recipe below
For the Herb Oil:
- 2 cups olive oil
- 1 cup chopped fresh herbs any combination of basil, parsley, oregano, tarragon, rosemary, thyme, cilantro, savory, and sage - OR - ⅓ cup dried herbs or a blend such as herbes de Provence (we used basil, parsley, oregano, thyme, and rosemary)
- 1 tablespoon coarse kosher salt
- 1 teaspoon ground black pepper
- 5 garlic cloves minced
Instructions
- 1. To Make the Herb Oil: Heat 2 cups of olive oil to about 100 degrees F. Add 1 cup of chopped fresh herbs or ⅓ cup dried herbs. We used a mixture of fresh basil, rosemary, thyme, oregano, and parsley. Add the salt, pepper, and garlic. Stir together and allow to steep while you prepare the dough.
- 2. Stir together the flour, salt, and yeast in a large mixing bowl. Add the olive oil and water and mix on low speed with the paddle attachment until all the ingredients form a sticky ball. Switch to the dough hook and mix on medium speed for about 5 to 7 minutes, or until the dough is soft and sticky. The dough should clear the sides of the bowl but stick to the bottom of the bowl.
- 3. Sprinkle enough flour on the counter to make a bed about 6 inches square. Using a scraper or spatula dipped in water, transfer the sticky dough to the bed of flour and dust liberally with flour, patting the dough into a rectangle. Let the dough relax for 5 minutes.
- 4. Coat your hands with flour and stretch the dough from each end to twice its size. Fold it, letter style, over itself to return it to a rectangular shape. Mist the top of the dough with spray oil, again dust with flour, and loosely cover with plastic wrap.
- 5. Let rest for 30 minutes. Stretch and fold the dough again; mist with spray oil, dust with flour, and cover. After 30 minutes, repeat this one more time.
- 6. Allow the covered dough to ferment on the counter for 1 hour. It should rise but not double in size.
- 7. Line a 17 by 12-inch sheet pan with baking parchment paper and drizzle olive oil over the paper. Spread the oil with your hands or a brush to cover the entire surface. Lightly oil your hands and, using a plastic or metal pastry scraper, lift the dough off the counter and transfer it to the sheet pan, maintaining the rectangular shape as much as possible.
- 8. Spoon half of the herb oil over the dough. Use your fingertips to dimple the dough and spread it to fill the pan simultaneously. Only use your fingertips to avoid tearing or ripping the dough. Try to keep the thickness as uniform as possible across the surface. Dimpling allows you to degas only part of the dough while preserving gas in the non-dimpled sections. If the dough becomes too springy, let it rest for about 15 minutes and then continue dimpling. Don’t worry if you are unable to fill the pan 100 perfect, especially the corners. As the dough relaxes and proofs, it will spread out and fill the pan. Use more herb oil as needed to ensure that the entire surface is coated with oil.
- 9. Loosely cover the pan with plastic wrap. Refrigerate the dough overnight (or for up to 3 days).
- 10.Remove the pan from the refrigerator 3 hours before baking. Drizzle additional herb oil over the surface and dimple it in. This should allow you to fill the pan completely with the dough to a thickness of about 1/2-inch. Cover the pan with plastic and proof the dough at room temperature for 3 hours, or until the dough doubles in size, rising to a thickness of nearly 1 inch.
- 11. Preheat the oven to 500 degrees F. Place the pan in the oven. Lower the oven setting to 450 degrees F and bake for 10 minutes. Rotate the pan 180 degrees and continue baking the focaccia bread for 5 to 10 minutes, or until it is lightly golden brown. The internal temperature of the dough should register above 200 degrees F (measured in the center of the loaf).
- 12. Remove the pan from the oven and immediately transfer the focaccia out of the pan onto a cooling rack. Allow the focaccia to cool for at least 20 minutes before cutting and serving.
Have you tried this recipe?
Leave a comment below and share a photo on Instagram. Tag @twopeasandpod and hashtag it with #twopeasandtheirpod
This focaccia looks amazing and it’s hands down one of my favorites! Beautiful!
Oh yes! This bread would be amazing with some homemade soup. I’m going to have to try that, but as you said, it may not make it to the soup portion. I’ll just eat it all out of the pan! 🙂
Your focaccia looks wonderful!
Hi Maria! I wanted to let you know that I have re-entered the blogging world. It only took me nearly 2 years after having my first. 🙂 Hope all is well with you guys – I’ve loved the updates on Caleb! They grow up so fast!
Your focaccia looks gorgeous! 🙂 I could just eat this for dinner with some marinara sauce! Yum!
I have never made foccacia – but you have made me want to try!
I love how you and your dad bake together! So cute. I”ve had this cookbook for forever but haven’t baked anything from it…shame on me!
Drooling. I need that garlicky rosemary taste!
One of my favorite breads 🙂
yummmmm that looks so delicious! i love how all the nooks and crannies trap the flavor! mmm! oh gluten, why must you exist?? 🙂 hahah thanks for sharing! gorgeous photography!
I’ve got focaccia on my mind this week, and yours sounds terrific.
I’m going to make this!
What did you serve it with?
I love focaccia! I’m always looking for new recipes – will definitely be trying this one soon.
Gorgeous! I love how quick and easy (and delicious) focaccia bread is 🙂
I love focaccia, and this looks delicious! Yummy! By the way, you have a great blog! Congratulations!
Thank you!
I love focaccia bread! this looks so good!
Love focaccia and that it is so easy to make
YUM! I love, love, love focaccia. I can’t wait to try this!
I have two of Peter Reinhart’s books & have made this same Focaccia bread several times. It’s so good!
This is the perfect accompaniment to any summer dish. I love the use of herbs!
We both love focaccia and can’t wait to try it soon, and pair it with a crisp Sauvignon Blanc.
Cheers 🙂
Yeas ago, I used to be on this huge focaccia kick – I’d pretty much have it daily. This looks so simple of loaded with herbs. Yum!
I agree with Averie, Maria! Your focaccia bread looks well executed. I want to try this one out at home but I am not sure if I am ready to yet. I’ll give it my best shot!
What can i use if I don’t have a paddle attachment or a bread hook?
You can knead the dough by hand.
thankxxxxxxxxx have to try it soon
Oh no, finally found the perfect recipe but I don’t have instant yeast!! Just active dry, does it matter???
Is it possible to bake this the same day instead of refrigerating overnight? Silly me looked at the ingredient list and thought “I have all of that!” And went ahead and started preparing the dough…and then I got to step 9. LOL! Was hoping to have this tonight without dinner 🙁
Love focaccia bread – can’t wait to try making this one!
would this recipe work if i added a biga to the dough
My focaccia did not rise as much as I expected and it came out very crunchy. The yeast bubbled like it was supposed to. Perhaps I used too much oil in each of the steps.
I’m not a seasoned bread maker by any means, but this was so easy. My 11 year old son had fun making it with me. I used it for a copy-cat Panera sandwich, and it was AMAZING and my only complaint was how messy the outside of the bread is. For eating it straight, it wasn’t such a big deal.
We were a little unsure about some of the folding, etc, but I think it’s very forgiving! I will try less oil next time, a good bit leaked onto the oven floor, but the bread still had plenty. Will also try baking in a large cake pan with higher sides. May also try mixing the herbs into the bread instead, to make it less messy to eat as a sandwich? Reminded me of pizza hut crust- may have to try to use for pizza somehow.
I love how quick it bakes too! That’s a huge plus (makes up for the two days of prep 🙂 )
This bread tasted quite good! It was a little too oily I found using the full two cups of oil for the topping and it didn’t really need any salt on top since it had so much flavor without.
It sure did make a lot of bread! How can you store it? Would it be possible to freeze it?
This was my first attempt at Focaccia bread and it was a smash success! The family, all nine of them, loved it. And, I’m gonna be honest here: I did it all in about an hour and a half. I want to try the recipe again sometime when I have time to do it according to the recipe, but honestly I just mixed it up, lined a pan with parchment, sprinkled the parchment with flour, spread it out thin, and let it proof until it was about an inch thick, then dimpled and spread the herb oil on and baked it according to directions. And it was SO GOOD!
Oh! And I forgot to say that I did not use the full 2 cups of olive oil for the herb oil. I actually only used about 1/2 cup, 2 Tb herbs, 1 tsp minced garlic. Then sprinkled the top with salt after. It was the perfect amount. More would have entirely overwhelmed it.
I’ve been makimg this recipe for our homeschool potlucks and I have to be careful to ration it or the last people will be angry they didn’t get any, haha! And I have to bake it shortly before leaving home, so my family has less time to eat it. It’s a lot of work for potlucks when it’ll be devoured in 10 minutes, but everyone requests it!
I’m not experienced at making bread, but it’s so forgiving, though I’m only now about to try it without the overnight step.
I find the olive oil taste a little strong for my preference, so I cut it with avocado oil. Adding the course salt right before baking takes it so over the top, I’m salivating thinking about it.
Thankfully I already had large deep cake pans, that does keep the mess out of the bottom of the oven.
I too originally found it when making a copycat Panera sandwich. But now I don’t bother with the rest of the sandwich, just the bread. I think this is my favorite food in the whole wide world.
Great bread recipe! I’ve made it several times over a couple of years and it is always wonderful! I don’t use 2 cups of oil, only one, and , for me, that works! Really nice texture and flavor. Freezes very well.
Thanks for your comment. I am so glad you love the recipe.